Battery switch on travel trailer function is crucial for managing your RV’s power. Understanding how these switches work – whether it’s a simple 1-2-both or a more complex system – is key to safe and efficient power management. This guide breaks down the different types, troubleshooting, maintenance, and safety aspects, ensuring you’re well-equipped to handle your travel trailer’s electrical system.
From identifying your switch’s location and type to mastering safe connection and disconnection procedures, we’ll cover everything you need to know. We’ll even explore how your battery switch interacts with solar panels and inverters for a more comprehensive understanding of your RV’s power setup. Get ready to become a power management pro!
Types of Battery Switches in Travel Trailers
Choosing the right battery switch for your travel trailer is crucial for managing your power sources efficiently and safely. Understanding the different types available will help you make an informed decision based on your specific needs and setup. This section will detail the common types of battery switches, their inner workings, and their respective pros and cons.
Battery Switch Types and Their Internal Workings
Travel trailers typically use battery switches to isolate or combine the power from different batteries (like a house battery and a starting battery). The most common types are 1-2-Both and 1-2-Off switches. Let’s explore each:
| Switch Type | Description | Advantages | Disadvantages |
|---|---|---|---|
| 1-2-Both | This switch allows you to select either battery 1 (often the starting battery), battery 2 (often the house battery), or both batteries simultaneously. Internally, it uses a rotary selector that connects the appropriate terminals to the output. Imagine three positions on a rotary dial: one connects to battery 1, another to battery 2, and the third connects both in parallel. | Simple operation, allows combining battery power for increased capacity. | If one battery is faulty, it can potentially affect the other (when in “Both” position). Increased risk of accidental short circuit if not handled carefully. |
| 1-2-Off | Similar to the 1-2-Both switch, but includes an “Off” position. This completely disconnects both batteries from the output, preventing any accidental drain. Internally, it’s similar to the 1-2-Both but with an added “Off” position where all connections are broken. | Provides complete isolation of both batteries, preventing parasitic drain. Safer than the 1-2-Both switch. | Slightly more complex to operate than a 1-2-Both switch; requires an extra step to disconnect completely. |
| Per-Battery Switches (Separate Switches) | This setup involves individual switches for each battery, offering independent control. Each switch directly connects or disconnects its respective battery. Internally, each switch is a simple on/off mechanism. | Maximum control and safety; isolates each battery completely, preventing cross-contamination of issues. Provides granular control. | Requires more switches and wiring, potentially more complex installation. |
Performance and Reliability Comparison
The 1-2-Both switch is generally the simplest and cheapest option, but offers the least safety. The 1-2-Off switch adds a crucial safety feature by allowing complete disconnection, reducing the risk of accidental drain. Separate per-battery switches offer the most control and safety, but increase the complexity of the installation. Reliability depends on the quality of the switch itself – reputable brands generally offer long-lasting performance regardless of type.
However, the simpler design of the 1-2-Both and 1-2-Off switches might make them slightly more robust in harsh conditions compared to multiple individual switches, but this is not a significant difference with quality components.
Troubleshooting Common Battery Switch Problems
Your travel trailer’s battery switch is a crucial component, managing the flow of power between your batteries and the trailer’s electrical system. A malfunctioning switch can leave you stranded without lights, appliances, or the ability to charge your batteries. Understanding how to troubleshoot problems with your battery switch is a valuable skill for any RV owner.Diagnosing a problem requires a systematic approach.
Let’s walk through a step-by-step procedure to identify the source of the issue.
Diagnosing a Malfunctioning Battery Switch
First, visually inspect the switch itself. Look for any obvious signs of damage, such as loose wires, corrosion, or physical damage to the switch housing. Next, check the connections to the switch. Make sure all wires are securely fastened and free from corrosion. A multimeter is invaluable at this stage.
With the switch in the “off” position, use the multimeter to check for continuity between the battery terminals and the switch terminals. There should be no continuity. Then, switch to the “on” position and check again; continuity should now exist. If you don’t have continuity in the “on” position, the switch itself might be faulty. If you have continuity in the “off” position, there’s a short circuit somewhere in the wiring.
Always disconnect the negative battery cable before performing any electrical tests to prevent accidental shocks.
Common Causes of Battery Switch Failure and Their Solutions
Several issues can cause your battery switch to malfunction. Addressing these problems often involves simple repairs or replacements.
- Corrosion: Corrosion on the terminals or switch contacts can impede current flow. Solution: Clean the terminals and contacts with a wire brush and baking soda solution. Apply a corrosion inhibitor after cleaning.
- Loose Connections: Loose wires or poorly connected terminals can interrupt the circuit. Solution: Tighten all connections securely. If necessary, replace any damaged wires or terminals.
- Internal Switch Failure: The switch itself might be worn out or internally damaged. Solution: Replace the faulty switch with a new one of the same type and amperage rating.
- Short Circuit: A short circuit in the wiring can cause the switch to malfunction or even overheat. Solution: Carefully trace the wiring to identify and repair the short circuit. This often requires isolating sections of wiring to pinpoint the fault.
- Incorrect Wiring: Improperly wired switches can lead to various problems. Solution: Verify the wiring diagram for your specific switch and trailer model. Ensure correct connections are made to avoid short circuits or incorrect functionality.
Safety Precautions When Troubleshooting Electrical Components
Working with electrical components in a travel trailer can be hazardous if proper safety precautions aren’t followed. Always disconnect the negative battery cable before beginning any troubleshooting or repair work. This prevents accidental shorts and electric shocks. Wear safety glasses to protect your eyes from sparks or debris. If you’re unsure about any aspect of the repair, consult a qualified RV technician.
Never work on electrical systems in wet or damp conditions. Improperly working on electrical components can lead to fire hazards. Remember, safety is paramount.
Connecting and Disconnecting Batteries using the Switch: Battery Switch On Travel Trailer Function
Properly using your battery switch is crucial for maintaining your travel trailer’s electrical systems and extending the life of your batteries. Incorrect operation can lead to premature battery failure, damage to sensitive electronics, and even dangerous situations. This section details the correct procedures for connecting and disconnecting your house and chassis batteries.Connecting and disconnecting your batteries involves manipulating your battery switch to control the flow of power between your batteries and your trailer’s electrical systems.
Understanding the different positions of the switch and their implications is key to avoiding problems. Remember, always consult your specific switch’s instructions, as they may vary slightly depending on the manufacturer.
Battery Switch Operation
The typical battery switch has several positions, commonly labeled “Off,” “Both,” “House,” and “Chassis.” “Off” completely disconnects both batteries from the trailer’s electrical system. “Both” connects both the house and chassis batteries together, providing maximum power. “House” connects only the house battery to the trailer’s systems, while “Chassis” connects only the chassis battery (typically used for starting the tow vehicle).
Improper switching can lead to draining one battery while leaving the other unused, reducing overall battery life and potentially leaving you stranded. For example, leaving the switch in the “Both” position while the trailer is not in use can drain both batteries rapidly, requiring a jump-start.
Visual Guide to Correct Switching Procedures
Imagine a diagram showing a battery switch with four positions clearly labeled: “Off,” “Both,” “House,” and “Chassis.” Connected to the switch are two batteries, clearly labeled “House Battery” and “Chassis Battery,” each with a positive (+) and negative (-) terminal. Arrows illustrate the flow of power depending on the switch position.Step 1: The switch is in the “Off” position.
So, you’re planning a trip? Awesome! Before you jet off, remember travel insurance is key. Check out aon travel insurance for comprehensive coverage. They’ve got options to fit every budget and travel style. And if you need another opinion, compare options at aon travel insurance to make sure you’re getting the best deal.
Don’t let unexpected events ruin your vacation – get insured and enjoy the trip!
No power flows to either battery or the trailer’s systems. This is the recommended position for long-term storage.Step 2: To use both batteries, move the switch to the “Both” position. Arrows indicate power flowing from both the House and Chassis batteries to the trailer’s electrical systems. This provides maximum power for running appliances and other systems.Step 3: To use only the house battery, move the switch to the “House” position.
Arrows show power flowing only from the House Battery to the trailer’s systems. This is useful when you’re parked and want to conserve the chassis battery’s charge.Step 4: To use only the chassis battery (e.g., to start your vehicle), move the switch to the “Chassis” position. Arrows indicate power flowing only from the Chassis Battery to the vehicle’s starting system.
This position is typically only used when starting the vehicle.Step 5: After using the trailer, always return the switch to the “Off” position to prevent battery drain.
Impact of Incorrect Switching Procedures
Incorrectly using the battery switch can lead to several issues. For example, leaving the switch in the “Both” position while parked for an extended period can completely drain both batteries, leaving you unable to start your vehicle or use your trailer’s systems. Similarly, leaving the switch in the “House” position while driving could drain the house battery and leave you without power once you reach your destination.
Regularly checking your battery levels and ensuring the switch is in the correct position for the situation is essential for preventing these problems. This proactive approach significantly extends the lifespan of your batteries and ensures reliable operation of your travel trailer.
So, you’re planning a trip? Awesome! Don’t forget travel insurance – it’s a lifesaver. Check out aon travel insurance for comprehensive coverage. They’ve got various plans, so you can find one that fits your needs and budget. Speaking of budget, remember to compare prices! Another great option to consider is aon travel insurance , as they often have competitive rates and excellent customer service.
Getting insured is a small price to pay for peace of mind during your adventures.
Battery Switch Maintenance and Care
Keeping your travel trailer’s battery switch in top condition is crucial for reliable power and preventing costly repairs. Regular maintenance ensures smooth operation and extends the lifespan of your switch, preventing potential problems down the road. Neglecting this simple task can lead to corrosion, poor connections, and ultimately, battery failure.Regular maintenance of your battery switch is straightforward and doesn’t require specialized skills.
A consistent schedule, combined with the right tools and materials, will keep your system functioning optimally. Remember, a well-maintained battery switch translates to a more enjoyable and reliable camping experience.
Battery Switch Maintenance Schedule, Battery switch on travel trailer function
A simple, twice-yearly inspection and cleaning routine will significantly extend the life of your battery switch. This should be performed at the beginning and end of your camping season. More frequent inspections might be necessary in harsh climates or if you notice any signs of corrosion or unusual behavior.
- Spring Inspection and Cleaning: Before your first camping trip, inspect the switch for corrosion, loose connections, and damage. Clean any corrosion using a wire brush and baking soda paste. Apply a corrosion inhibitor to protect against future corrosion.
- Fall Inspection and Cleaning: After your last camping trip, repeat the spring inspection and cleaning process. This removes any accumulated salt, grime, or moisture that might have built up during the season.
Importance of Lubricants and Corrosion Inhibitors
Using the right lubricants and corrosion inhibitors is essential for preventing problems and maximizing the lifespan of your battery switch. Corrosion is the enemy of electrical connections, leading to resistance, poor performance, and even fire hazards. Lubricants ensure smooth operation of moving parts within the switch, preventing wear and tear.
- Corrosion Inhibitors: Apply a dielectric grease or a corrosion inhibitor spray to the terminals and connections. These protect against moisture and oxidation, ensuring clean, consistent electrical contact. Many automotive stores carry these products.
- Lubricants: If your switch has any moving parts (such as a lever or slide mechanism), apply a small amount of a non-conductive lubricant like silicone-based grease. This ensures smooth operation and prevents binding or sticking.
Tools and Materials for Battery Switch Maintenance
Having the right tools readily available makes maintenance quick and efficient. Gathering these beforehand ensures you have everything you need for a thorough cleaning and inspection.
- Wire brush (brass or nylon)
- Baking soda
- Water
- Clean rags or paper towels
- Dielectric grease or corrosion inhibitor spray
- Non-conductive lubricant (silicone-based grease)
- Safety glasses
- Gloves (optional, but recommended)
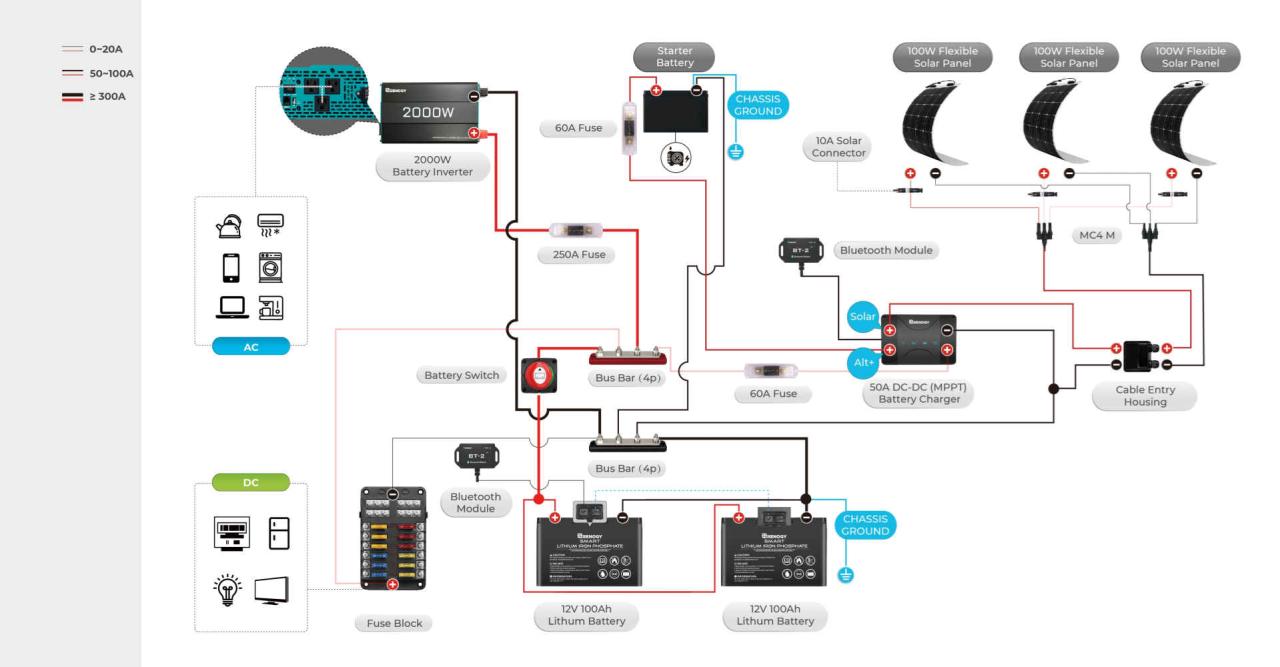
Integrating Battery Switches with Solar Panels and Inverters
Adding solar panels and an inverter to your travel trailer’s electrical system significantly enhances its off-grid capabilities. The battery switch plays a crucial role in managing the flow of power between these components and your trailer’s house batteries. Understanding their interaction is key to maximizing efficiency and preventing damage.A battery switch acts as a central control point, allowing you to isolate or connect different battery banks, including those charged by solar panels.
This isolation is crucial for safety and maintenance. The inverter, on the other hand, converts DC power from your batteries into AC power to run household appliances. The interplay between these components requires careful consideration of wiring and switch configuration.
Solar Panel and Inverter Connection to the Battery Switch
A typical setup involves the solar panel’s charge controller connecting directly to the battery bank. The battery switch then controls whether this charged battery bank powers the trailer’s 12V DC system and, indirectly, the inverter. When the switch is ON, the charged batteries provide power to both the 12V system and the inverter. When OFF, the batteries are disconnected, preventing discharge.
The inverter draws DC power from the batteries to produce AC power for your appliances; the battery switch acts as the main on/off for this power source. Imagine a simple diagram: a solar panel with its charge controller feeding into the positive terminal of the battery bank. The negative terminal connects to the chassis ground. The battery switch is then placed in the positive line between the battery bank and the rest of the trailer’s 12V DC system.
A separate wire runs from the battery bank (after the switch) to the input terminals of the inverter.
Benefits of Integration
Integrating solar panels, inverters, and battery switches offers several advantages. Firstly, it allows for extended off-grid use, reducing reliance on shore power. Secondly, it optimizes battery charging by utilizing solar energy. Thirdly, it enhances the overall safety of the system by providing a central disconnect point for the batteries. For example, a family using a travel trailer for extended camping trips in remote areas can rely on solar power to keep their lights and appliances running for days, minimizing the need to find hookups.
Challenges of Integration
Proper integration requires careful planning and execution. Incorrect wiring can lead to short circuits or damage to components. Furthermore, ensuring compatibility between the solar charge controller, inverter, and battery switch is crucial. Another challenge involves sizing the components appropriately to meet your energy needs. For instance, undersizing the solar panel array may not generate enough power to keep up with energy consumption, while an oversized inverter could draw excessive current from the batteries, potentially shortening their lifespan.
Additionally, monitoring the battery state of charge is essential to prevent deep discharging, which can damage the batteries.
Safety Considerations when Using the Battery Switch
Working with your travel trailer’s battery system involves electricity, which can be dangerous if not handled correctly. Improper use of the battery switch can lead to serious consequences, including electric shock, fire, and damage to your RV’s electrical system. Understanding the potential hazards and following safety guidelines is crucial for preventing accidents.Understanding the electrical system of your travel trailer is paramount before working with the battery switch.
This includes knowing the voltage of your batteries (typically 12V), the amperage draw of your appliances, and how the various components of your electrical system are interconnected. This knowledge allows you to safely and effectively manage the power flow and prevent potentially hazardous situations.
Potential Hazards Associated with Improper Battery Switch Use
Improper use of the battery switch can result in several serious hazards. Accidental contact with exposed terminals or wires while the switch is on can cause a painful electric shock, potentially leading to more severe injuries. A short circuit, caused by incorrect wiring or accidental contact, can generate intense heat, potentially igniting nearby flammable materials and causing a fire.
Furthermore, incorrect switching can lead to damage to the batteries themselves, the switch itself, or other components of your electrical system. For example, accidentally connecting the batteries in reverse polarity can damage the battery and other connected devices.
Safety Guidelines for Operating the Battery Switch
It’s crucial to follow these safety guidelines when operating your travel trailer’s battery switch:
- Always disconnect the negative (-) battery cable before working on any part of the electrical system, including the battery switch. This isolates the system and minimizes the risk of electric shock.
- Wear appropriate safety gear, including safety glasses and insulated gloves, to protect yourself from potential hazards. Insulated gloves will prevent electric shock and protect your hands from burns.
- Ensure the battery switch is firmly in the “OFF” position before making any connections or disconnections. Double-check the switch’s position to confirm it’s off.
- Inspect all connections for corrosion or damage before turning the switch on. Clean any corroded terminals with a wire brush and baking soda solution before reconnecting.
- Never touch exposed wires or terminals while the switch is in the “ON” position. Even low voltage can cause a painful shock.
- If you smell burning or notice any unusual sounds or sparks, immediately turn off the battery switch and disconnect the negative battery cable. Seek professional help to diagnose and repair the problem.
- If you are unsure about any aspect of operating the battery switch or working with your RV’s electrical system, consult a qualified RV technician or electrician. It’s better to be safe than sorry.
Importance of Understanding the Electrical System
Before attempting any work on your travel trailer’s electrical system, including using the battery switch, it is vital to have a good understanding of how the system functions. This involves knowing the voltage and amperage ratings of your batteries and appliances, understanding the role of the battery switch in managing power flow, and being aware of potential hazards associated with improper operation.
Consult your RV’s owner’s manual or seek professional assistance if you are unsure about any aspect of your electrical system. A basic understanding of electrical principles will prevent mistakes and keep you safe.
Mastering your travel trailer’s battery switch is about more than just flipping a switch; it’s about ensuring safe and efficient power management for your adventures. By understanding the different types of switches, troubleshooting common problems, and performing regular maintenance, you can extend the life of your batteries and avoid costly repairs. Remember safety first – always disconnect before working on any electrical components.
Happy travels!
Questions and Answers
What happens if I accidentally leave the battery switch in the wrong position?
Depending on the position, you could drain your batteries, damage sensitive electronics, or create a safety hazard. Always double-check the switch position before leaving your trailer.
How often should I clean my battery switch?
At least once a year, or more frequently if exposed to the elements. Inspect for corrosion and clean with a wire brush and baking soda solution.
Can I use WD-40 on my battery switch?
No, WD-40 is not suitable for battery switches. Use a dielectric grease specifically designed for electrical connections.
My battery switch is stuck. What should I do?
Try using a penetrating lubricant (like a specialized electrical contact cleaner) and gently work the switch back and forth. If it remains stuck, consult a qualified RV technician.
